How does it work?
The purpose of this page is to explain how we create a 3D image. Click the images to enlarge them.
|
Modelling
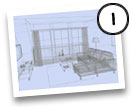 The first step when creating a 3D image is the modelling for which we use 3D Studio Max.
In many cases the client will supply a CAD model which will save us some time but we can create 3D models from basically any material.
The first step when creating a 3D image is the modelling for which we use 3D Studio Max.
In many cases the client will supply a CAD model which will save us some time but we can create 3D models from basically any material.
Image nr 1 shows the first step of the 3D model, a wireframe model.
|
Flat shading
 Image nr 2 shows the same model with polygon surfaces and only the most basic form of lighting - flat shading.
There are projects when the main purpose is to give the client a perception of space and a simple image like this will do the job.
In this particular case the client has ordered a realistic image which is why we continue to the texturing.
|
Texturing
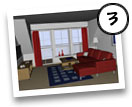 Texturing means applying images or material to the surfaces of the model.
Adding textures gives the model more life but without proper light it's still far from realistic - see image nr 3.
|
Lighting
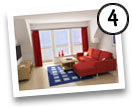 Adding realistic light to a virtual environment is the most complicated part of the process.
We supply all the information required for the computer to calculate the light, i.e. the intensity and direction of the outdoor light,
information about interior light sources and reflection characteristics of all the materials in the model.
With all this information a piece of software will created the lighted image, a process that can take hours for a single image - see image nr 4.
|
Post production
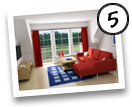 Even after the realistic light has been added, some additional work may be necessary.
In this case we have added a background image, visible through the windows, and made small changes in the colour of the image - see image nr 5.
A film showing the whole process - Requires Flash.
|

)
)
)
)
)